Version Control With Git
Setting up Your SSH Keys
SSH keys identify your computer, and allow for the secure exchange of files between your computer and Git. You will only be able to push code to GitHub if your computer has an SSH key that is registered to your GitHub account. The following code should be run in the terminal.
NOTE generating a set of SSH keys generates a private key (for you) and a public key (to be used on GitHub or on a server). Do not EVER share a private SSH key with someone. Only ever put the .pub key online.
Generating an SSH Key Pair
Navigate to your home directory:
[ ]:
# go to your home directory
cd ~/
Check if you already have ssh keys:
[ ]:
# check if you have a .ssh/id_rsa file
ls .ssh
If you don’t have the folder .ssh then this will give you an error and it means you don’t have any existing keys (the folder will get created automatically). If you see a list of existing keys, make note of their names so that you can give your new key a new name.
[ ]:
# generate a new SSH key pair
# By default this will create a key pair in ~/.ssh/id_rsa (id_rsa and id_rsa.pub)
# If the SSH protocol on your computer is not rsa, then the name will be slightly different. this is fine.
ssh-keygen
Follow the prompts. Do not set a passphrase. Pressing eneter will accept the defaults. You will have the option to give your new key a new name if you already had SSH keys in .ssh/ (do not overwrite them).
Add the SSH key to GitHub
Go to your GitHub profile, click the profile icon, and go to settings. Settings -> SSH and GPG Keys -> New SSH Key. Give it a name you will recognize (ellen’s-laptop). Copy the contents of .ssh/id_rsa.pub (or your specified filename) into the new key info on GitHub. Click ‘Add SSH Key’.
NOTE The first time you exchange info through a new SSH-key pair you will receive a prompt that checks whether you meant to do this (it usually says something about a new fingerprint and asking you to confirm that you want to add it to your list of known hosts). This would be the first time you do a git push or git pull with a new SSH key, or the first time you log into a server. You should say yes.
Verify your Git Installation
Everyone should already be able to run git --version in their terminal, in order to identify that you have git installed (it will tell you which version).
[2]:
git --version
git version 2.50.1
Git commands always have the same structure:
git <command> <options>
Configuring your Git Username and Email
The first thing we will do is configure our installation of Git to know who we are. This identifies you (and your GitHub account) as the person who made the file changes. The email you use should be the email associated with your GitHub account.
[ ]:
git config --global user.name "githubusername"
git config --global user.email "githubemail@gmail.com"
Setting up a Repository
All of this code should be run from the terminal
Next we need to choose a folder that we want to track. Use mkdir to create a new folder that will serve as our version controlled project.
TIP There is no single way to name a repository, but if you want to follow the most popular convention, it is called kebab-case. kebab-case separates lower case words with hyphens. This can help to distinguish code from regular directories on your computer.
[5]:
# make the new folder, called new-repo
mkdir new-repo

# enter the new project
cd new-repo

#check that we are in the right place
pwd
[ ]:
# initialize this folder as a git repository
git init
You should see output like the following, although for older versions of git there may not be an output and that is OK:
hint: Using 'master' as the name for the initial branch. This default branch name
hint: is subject to change. To configure the initial branch name to use in all
hint: of your new repositories, which will suppress this warning, call:
hint:
hint:   git config --global init.defaultBranch <name>
hint:
hint: Names commonly chosen instead of 'master' are 'main', 'trunk' and
hint: 'development'. The just-created branch can be renamed via this command:
hint:
hint:   git branch -m <name>
hint:
hint: Disable this message with "git config set advice.defaultBranchName false"
Initialized empty Git repository in <path-to-your-repo>/new-repo/.git/
You should see the following:
On branch master

No commits yet

nothing to commit (create/copy files and use "git add" to track)
TIP Git output often tells you how to do the next thing. Always read the output of your git commands to know how to proceed. For example, Git told us that we don’t have anything to commit and that if we want to commit something we should create a new file and use git add. That’s what we will do!
Every Git repository should have a README.md (markdown file). At the least this file just says the name of the repository. Over time it can include details such as links to supporting references, DOIs, links to papers or zenodo, installation instructions.
[ ]:
# Create a README markdown file that says the repository name using echo and >>
echo "# new-repo" >> README.md
Now that we have added a file called README.md we should see something new when we run git status.
[ ]:
git status
Output:
On branch main

No commits yet

Untracked files:
  (use "git add <file>..." to include in what will be committed)
    README.md

nothing added to commit but untracked files present (use "git add" to track)
Git can see that we have a new file that didn’t exist before and that it is not tracked (indicated by the red color). Git also tells us that we have not staged anything to commit. Better yet, the output of git status tells us what we need to do to track this new file.
[ ]:
# add the README file to the staging area
git add README.md
[ ]:
git status
Output:
On branch main

No commits yet

Changes to be committed:
  (use "git rm --cached <file>..." to unstage)
    new file:   README.md
Git sees that we have staged the README.md file (indicated by green color) and indicates that it will be committed (when we use git commit). It also indicates the type of file (new file). In other cases this might indicated a changed file, deleted file, or moved file.
TIP always, always, always use commit messages. You can technically commit without any message, but adding a commit message with the -m option will add a short descriptor to the commit. This will be critical for collaborating with others and looking at the history of your changes.
[ ]:
# commit our changes with a message indicating this is the first commit to the repo
git commit -m "initial commit"
Output:
[main (root-commit) 3aa75e5] initial commit
 1 file changed, 1 insertion(+)
 create mode 100644 README.md
[ ]:
git status
Output:
On branch main
nothing to commit, working tree clean
Now we can also look at our history to see what has happened so far in this repository.
[ ]:
# check the history of commits in this repo
git log
Output:
commit 3aa75e5bcd3810a17511db947d50d7d75a728818 (HEAD -> main)
Author: eldavenport <ellendavenport7@gmail.com>
Date:   Thu Jul 31 11:23:35 2025 -0700

    initial commit
We can see the date and time of the commit, who authored the commit, and the commit message. We can also see a unique identifier for the commit called the commit hash. In this case the hash starts with 3aa75. Commit hashes will be useful in more advanced git operations.
The last thing we will do, is we will follow the initial suggestion and rename our master branch to main. That’s because master is an outdated term and main, trunk, or dev are considered to be standard. You could have done this right away when you received that message. Older versions of Git, however, require that you have one commit prior to renaming the branch.
[ ]:
# change the default branch name to main, if this succeeds there will be no output.
git branch -m main

# check that we are on main
git status
Break to get caught up
Pushing our changes up to GitHub
Let’s summarize where we are…
we have a repository named new-repo
we created a README.md for new-repo and we committed it
This means that our current version of README.md is saved, and we can always return to this state even if we upate README.md and commit the changes. Our git log will always allow us to return to this exact version of the README.md if we want.
But … there’s one issue. Our work is only on our local computer. We need to finish the initialization by pushing the work up to GitHub. Then our work is backed up and our changes are tracked.
Create a new repository on GitHub
See our tutorial on ‘Navigating GitHub’ and then return here to continue.
Link our Local Repo to the GitHub one
[ ]:
# Tell Git where we will send the code when we push it to the cloud (i.e., GitHub).
# This creates a repository on our GitHub that is backed up.
# Our local version of the repo will be synced to the GitHub repo.
git remote add origin git@github.com:<git-username>/<reponame>.git

# For me this will be git@github.com:eldavenport/new-repo.git
Let’s push our repo to the cloud!
TIP The first time your create a new repository, you have to tell Git which remote (i.e., in the cloud) repository the changes should be linked to. This is done with the command -u. The -u stands for upstream, which is the repository on GitHub. In most cases the upstream and the local copy of your repo (i.e., the folder your work is in) will be named this same thing. After you have done this once, you no longer need to use -u.
[ ]:
# Push our changes (right now just a markdown file) to the cloud
# origin indicates we are pushing to the remote (origin, which we added above)
# main indicates we are pushing to the main branch (we are on main locally and pushing to main remotely)

git push -u origin main
Output:
Enumerating objects: 3, done.
Counting objects: 100% (3/3), done.
Writing objects: 100% (3/3), 223 bytes | 223.00 KiB/s, done.
Total 3 (delta 0), reused 0 (delta 0), pack-reused 0 (from 0)
To github.com:eldavenport/new-repo.git
 * [new branch]      main -> main
branch 'main' set up to track 'origin/main'.
This tells us that we pushed our local branch main to the remote branch main (main -> main). It also notifies us that this is a new branch (* [new branch]) and that our local branch main is tracking the remote branch origin/main. origin/ will always indicate a location on the remote.
Refresh your GitHub page and you should see the new repo!
Note how the online interface contains tons of info, including: Who authored the last changes, when were the last changes made, what files do we have, what is our change history, is the repo public, etc.
Cloning a Repository
Now that you have a repo on your GitHub, you can clone it wherever you want (a lab computer, a server, another personal computer). This also means that someone else (a collaborator) can also clone your code. To clone a git repo, click the green button that says Code and copy the SSH URL.
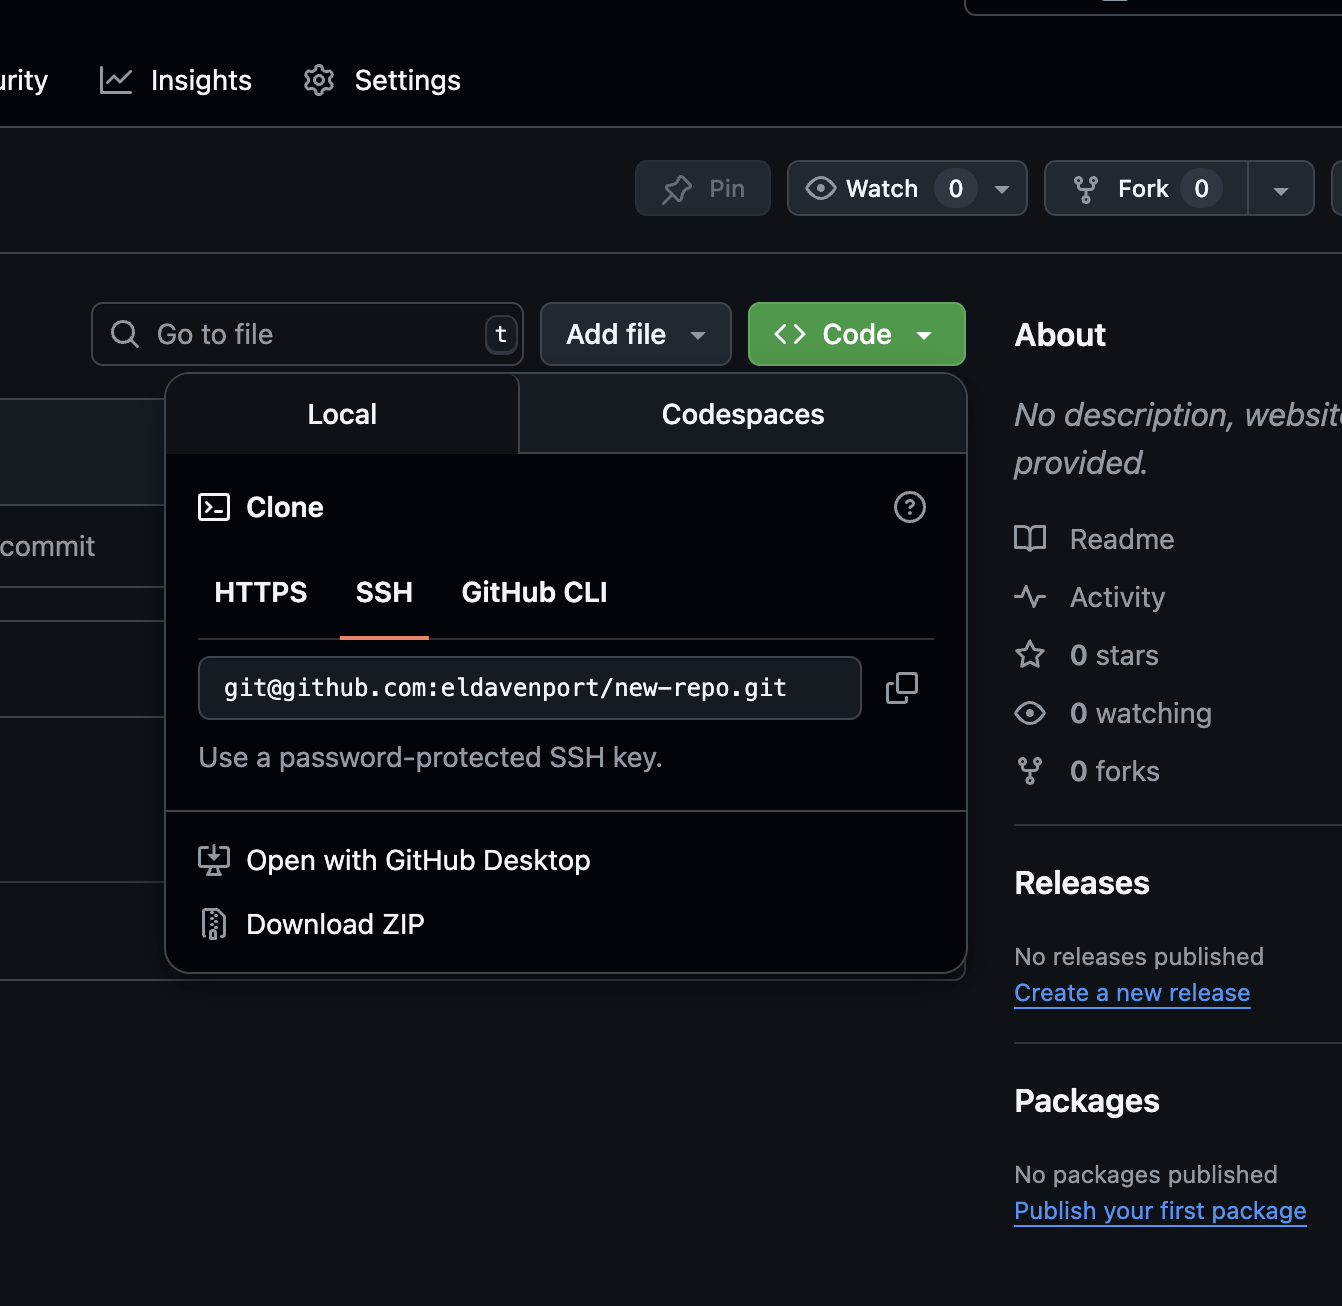
Copy this URL. To clone the repo to a computer with Git installed and with an SSH key, use:
[ ]:
git clone <ssh_url>
Break to get caught up (15 min)
Adding a .gitignore
You do not want to use git as a data storage location. Text files are very small. Data files can be very large. GitHub has a limit to the amount of stuff that can go in a single repo. It is a few GB which would be TONS of code…but not that much data. Pushing/pulling and checking the status of your files will get very slow if Git has to scan big data files every time. Data should be stored in an actual storage location (on a server, drive, or cloud location). You can also have a copy of data locally and you can tell Git to ignore it. We do this by creating a .gitignore file.
[ ]:
# create and open a file called .gitignore (in the top level of the repo, i.e., in new-repo/)
vim .gitignore
[ ]:
# insert the following line to ignore .csv files in the top level
*.csv

# insert the following line to ignore .csv files in all subfolders
**.csv
If I want to ignore all mat, csv, and netcdf files in my project (i.e., not add them to be tracked by my repository). My file new-repo/.gitignore will contain the following:
**.csv
**.nc
**.cdf
**.mat
[ ]:
git status
Output:
On branch main
Your branch is up to date with 'origin/main'.

Untracked files:
  (use "git add <file>..." to include in what will be committed)
    .gitignore

nothing added to commit but untracked files present (use "git add" to track)
[ ]:
git add .gitignore
git commit -m "adding gitignore file"
git push
At this point you can move data files into your repo and git will not try to track them.
Exercises (15-20 min)
1
A trust building experiment …
delete the repo on your computer
make sure it is gone! (
rm -rfthat thing!)… reassure yourself that it is still on GitHub! nothing has changed…
go to a new location in your computer
clone your new repostiory to this new location
cd into the repo to see that your README.md file is there!
2
Add your own work to GitHub! Please! Take this time to add a project of your own to GitHub. We would love to see people do this now, so that you can explore or share your code online throughout the rest of our tutorials. Make sure to add a .gitignore to ignore any large data files before you push the new repo to GitHub!
3
Make a test repo and have your neighbor clone it to their computer!
4
Add a python script to your repo (create one or copy an existing one here). Add and commit the script and push it to GitHub.
Best Practices For Git Repos
Documentation: Every repo should have a README.md.
Committing: Commit often, once for each new task you accomplish. If a single commit includes tons of changes, then you will struggle to understand them or undo them.
Pushing: Push whenver you get the chance. Any code that isn’t pushed can still be lost.
Licensing: When you are making code that you think other people might use, consider adding a license (GitHub has licenses you can choose from).
References: In addition to licensing, code that supports research can have related DOI or Zenodo links
Security: Use SSH whenever you can (not https), because it is a more secure protocol.
Large Files: Do not store large files on git, always have a .gitignore. If you need to manage large files look here: Git Large File Storage
``Diff`` Changes To Your Code
git diff allows you to see the changes you have made to a file. This can be used to see the current changes or the difference between two older version of the file. It can also be used to see the difference between the same file on two branches.
Let’s start by adding something to our README.md. Open it in whatever text editor you want (on the command line or with your file explorer). Add something to the file. For example, my file now includes the following:
# new-repo

Test repository for software workshop.
[ ]:
git status
This will show that your file is changed:
Changes not staged for commit:
  (use "git add <file>..." to update what will be committed)
  (use "git restore <file>..." to discard changes in working directory)
    modified:   README.md
To see what exactly changed about the file we can use git diff.
[ ]:
git diff README.md
My output shows me the text that was added to README.md
diff --git a/README.md b/README.md
index be0b5cd..a21bc64 100644
--- a/README.md
+++ b/README.md
@@ -1 +1,3 @@
 # new-repo
+
+Test repository for software workshop.
``Checkout`` Different Versions of Your Code
The git checkout command allows you to load a different copy or version of your code (like at the library!). This could be an old commit, another branch, or a different version of a single file.
As we noted earlier, every commit has a unique hash associated with them. If you would like to look at an older version of your code, you can use git checkout <commit-hash>. The commit hash can be obtained from git log. This is why descriptive commit messages are important!
[ ]:
git checkout <commit-hash>
Creating a New Branch
A new branch can be created by adding the -b flat to the git checkout command and providing a branch name:
[ ]:
git checkout -b new_feature_branch
The above command will create new_feature_branch and move us onto that branch. To return to our main branch we can type:
[ ]:
git checkout main
We can view the list of branches and which one we are on with:
[ ]:
git branch
Let’s checkout the new_feature_branch and add a file:
[ ]:
git checkout new_feature_branch
touch empty_file.txt
git status
We can see that we are on the new branch and that there is a new file. We can add and commit our file to save our changes.
[ ]:
git add empty_file.txt
git commit -m "adding an empty file to our feature branch"
If we use ls we can see that the file is in our folder. If we checkout the main branch, we will see the file disappear!
[ ]:
git checkout main
ls
Switching back to the feature branch, the file reappears.
[ ]:
git checkout new_feature_branch
Now we want to push our changes to GitHub, so that our work on this branch is backed up. This branch only exists our our local computer, and not on GitHub, so we will need to tell GitHub where to link it. The standard is to tell GitHub to create a branch of the same name on the remote and to link it to the local copy. You will recognize this command from our first push on the main branch. You will only have to do this once, afterward you will be able to simply enter git push.
[ ]:
git push -u origin new_feature_branch
Branching Exercise (10 min)
Go to your GitHub profile and then to your repository. Explore the available branches. Can you find a way to see the difference between the main branch and the new branch?
Merging a Branch Back into Main
When we are done with the feature on our new branch, we will want to merge the code into main so that it becomes a part of our project long term and we no longer need to checkout the feature branch. We will do this with git merge.
[ ]:
# checkout the branch you want to merge into
git checkout main
[ ]:
# merge new_feature_branch into the current branch (main)
git merge new_feature_branch
If we inspect our folder with ls we will see our empty_file.txt is on the main branch!
[ ]:
# push the updated main branch to the remote repository
git push
GitHub Issues
how to open an issue
what should I put in my issue? (best practices)